gget-mcp


MCP (Model Context Protocol) server for the gget bioinformatics library.
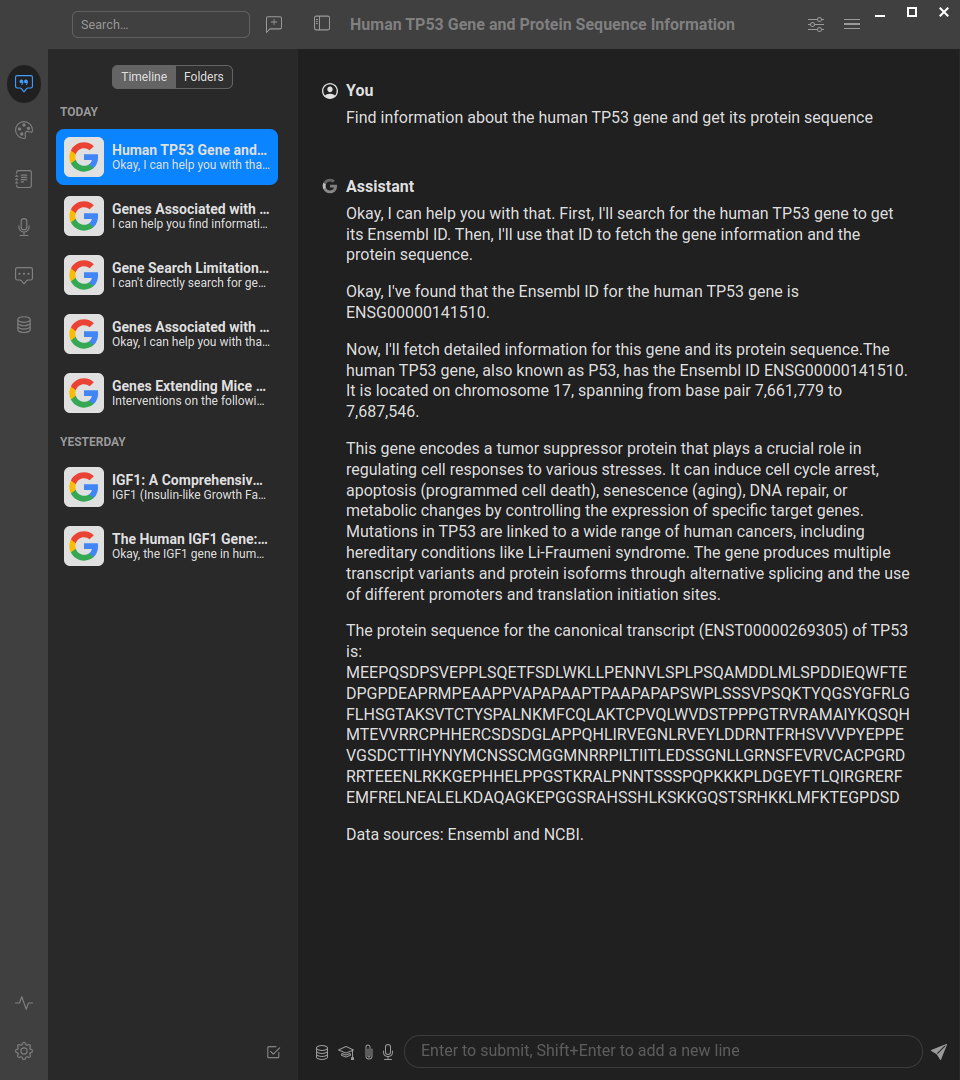
This server implements the Model Context Protocol (MCP) for gget, providing a standardized interface for accessing powerful bioinformatics tools and databases. MCP enables AI assistants and agents to perform complex genomics queries through structured interfaces.
The gget bioinformatics toolkit provides efficient querying of genomic databases and includes functions for:
- Gene and sequence information retrieval
- BLAST and sequence alignment
- Protein structure prediction
- Gene expression analysis
- Functional enrichment analysis
- And much more!
🚀 Quick Example: What Can You Do?
<details> <summary>See how the gget MCP server works in practice with AI assistants</summary>👤 User: "Analyze the TP53 gene - find its details and protein sequence, then check for cancer mutations"
🤖 AI Assistant: I'll help you analyze TP53 step by step:
[Uses gget_search] → Found TP53 (ENSG00000141510) on chromosome 17
[Uses gget_info] → TP53 is a protein-coding tumor suppressor gene
[Uses gget_seq with translate=True] → Retrieved 393 amino acid protein sequence
[Uses gget_cosmic] → Found hotspot mutations R175H, R248Q, R273H in multiple cancers
👤 User: "Now predict the 3D structure of this protein sequence: MSKGEELFTGVVPILVEL..."
🤖 AI Assistant: Let me analyze this sequence:
[Uses gget_blast] → Identified as Green Fluorescent Protein (GFP)
[Uses gget_alphafold] → Predicted classic beta-barrel structure with 90%+ confidence
👤 User: "Perform pathway enrichment for DNA repair genes: TP53, BRCA1, BRCA2, ATM"
🤖 AI Assistant: [Uses gget_enrichr] → Top pathways: DNA Damage Response, Homologous Recombination, Cell Cycle Checkpoints, p53 Signaling
See how powerful this is? You can now ask natural language questions about genes, sequences, mutations, and pathways - the AI does the complex bioinformatics work for you!
</details>About MCP (Model Context Protocol)
<details> <summary>Learn more about the Model Context Protocol</summary>MCP is a protocol that bridges the gap between AI systems and specialized domain tools. It enables:
- Structured Access: Direct connection to powerful bioinformatics tools and databases
- Natural Language Queries: Simplified interaction with complex genomics workflows
- Type Safety: Strong typing and validation through FastMCP
- AI Integration: Seamless integration with AI assistants and agents
If you want to understand more about what the Model Context Protocol is and how to use it more efficiently, you can take the DeepLearning AI Course or search for MCP videos on YouTube.
</details>Available Tools
<details> <summary>Comprehensive bioinformatics functionality through gget</summary>Gene Information & Search
gget_search: Find Ensembl IDs associated with search termsgget_info: Fetch detailed information for Ensembl IDsgget_seq: Retrieve nucleotide or amino acid sequencesgget_ref: Get reference genome information from Ensembl
Sequence Analysis
gget_blast: BLAST nucleotide or amino acid sequencesgget_blat: Find genomic locations of sequencesgget_muscle: Align multiple sequences
Expression & Functional Analysis
gget_archs4: Get gene expression data from ARCHS4gget_enrichr: Perform gene set enrichment analysis
Protein Structure & Function
gget_pdb: Fetch protein structure data from PDBgget_alphafold: Predict protein structure using AlphaFold
Cancer & Mutation Analysis
gget_cosmic: Search COSMIC database for cancer mutations
Single-cell Analysis
gget_cellxgene: Query single-cell RNA-seq data from CellxGene
Quick Start
<details> <summary>Installing uv (optional - uvx can auto-install)</summary># Download and install uv
curl -LsSf https://astral.sh/uv/install.sh | sh
# Verify installation
uv --version
uvx --versionuvx is a very nice tool that can run a python package installing it if needed.
</details>Running with uvx
You can run the gget-mcp server directly using uvx without cloning the repository:
# Run the server in HTTP mode (default)
uvx gget-mcp httpSTDIO Mode (for MCP clients that require stdio)
# Run the server in stdio mode
uvx gget-mcp stdioHTTP Mode (Web Server)
# Run the server in streamable HTTP mode on default (3002) port
uvx gget-mcp http

# Run on a specific port
uvx gget-mcp http --port 8000SSE Mode (Server-Sent Events)
# Run the server in SSE mode
uvx gget-mcp sseIn cases when there are problems with uvx often they can be caused by cleaning uv cache:
uv cache cleanThe HTTP mode will start a web server that you can access at http://localhost:3002/mcp (with documentation at http://localhost:3002/docs). The STDIO mode is designed for MCP clients that communicate via standard input/output, while SSE mode uses Server-Sent Events for real-time communication.
Note: Currently, we do not have a Swagger/OpenAPI interface, so accessing the server directly in your browser will not show much useful information. To explore the available tools and capabilities, you should either use the MCP Inspector (see below) or connect through an MCP client to see the available tools.
Configuring your AI Client (Anthropic Claude Desktop, Cursor, Windsurf, etc.)
We provide preconfigured JSON files for different use cases. Here are the actual configuration examples:
STDIO Mode Configuration (Recommended)
Use this configuration for most AI clients. Use this mode when you want to save large output files (sequences, structures, alignments) to disk instead of returning them as text. Create or update your MCP configuration file:
{
  "mcpServers": {
    "gget-mcp": {
      "command": "uvx",
      "args": ["--from", "gget-mcp@latest", "stdio"]
    }
  }
}HTTP Mode Configuration
For HTTP mode:
{
  "mcpServers": {
    "gget-mcp": {
      "command": "uvx",
      "args": ["--from", "gget-mcp@latest", "server"]
    }
  }
}Configuration Video Tutorial
For a visual guide on how to configure MCP servers with AI clients, check out our configuration tutorial video for our sister MCP server (biothings-mcp). The configuration principles are exactly the same for the gget MCP server - just use the appropriate JSON configuration files provided above.
Inspecting gget MCP server
<details> <summary>Using MCP Inspector to explore server capabilities</summary>If you want to inspect the methods provided by the MCP server, use npx (you may need to install nodejs and npm):
For STDIO mode with uvx:
npx @modelcontextprotocol/inspector --config mcp-config.json --server gget-mcpYou can also run the inspector manually and configure it through the interface:
npx @modelcontextprotocol/inspectorAfter that you can explore the tools and resources with MCP Inspector at which is usually at 6274 port (note, if you run inspector several times it can change port)
</details>Integration with AI Systems
Simply point your AI client (like Cursor, Windsurf, ClaudeDesktop, VS Code with Copilot, or others) to use the appropriate configuration file from the repository.
Platform-Specific Setup Guides
Claude Desktop + gget_mcp Step-by-Step Guide (Windows)
<details> <summary>Comprehensive Windows setup guide with Google Drive integration</summary>Overview
This guide will walk you through setting up Claude Desktop with the gget_mcp extension and Google Drive integration on Windows. By the end, you'll be able to use Claude to fetch biological data (like gene sequences) and save them directly to your Google Drive folder with offline access.
Prerequisites
- Windows PC with administrator access
- Google account
- Stable internet connection
Step 1: Set Up Google Drive for Desktop with Offline Access
-
Download and install Google Drive for Desktop
-
Launch the application and sign in with your user account
-
Connect your project's shared Google account (if applicable)
-
Configure offline access for your working folder:
- Navigate to the folder you want to work with in Google Drive
- Right-click on the folder (e.g., "work" or your project folder)
- Select "Available offline" from the context menu
- This makes the folder accessible at a path like
C:\GDrive\holy-bio-mcp\My Disk\work
Important: This is different from just syncing - offline access ensures the files are locally available while still being part of your Google Drive structure.
Step 2: Install Claude Desktop
- Download Claude Desktop for Windows
- Run the installer and follow the setup wizard
- Sign in with your Anthropic/Claude account
- Complete the initial setup
Step 3: Install uv Package Manager
-
Install
uvusing one of these methods:Option A: Using winstall
- Visit https://winstall.app/apps/astral-sh.uv
- Follow installation instructions
Option B: Using PowerShell
powershell -c "irm https://astral.sh/uv/install.ps1 | iex" -
Restart your terminal after installation
Step 4: Install Node.js
You can install Node.js using either method:
Option A: Native Installer
- Visit https://nodejs.org/en/download
- Download the Windows installer (LTS version recommended)
- Run the installer with default settings
Option B: Using Chocolatey
choco install nodejsBoth methods work equally well - choose whichever you prefer.
Step 5: Verify Installation & Cache Packages
Open Command Prompt or PowerShell and run:
uvx --from gget-mcp@latest stdioExpected behavior:
- The command should start without errors
- Packages will be downloaded and cached
- If it runs successfully, everything is configured correctly
- You can press
Ctrl+Cto stop it
Step 6: Configure Claude Desktop
6.1: Enable Filesystem Extension
- Open Claude Desktop
- Go to Settings (gear icon)
- Navigate to the "Extensions" tab in the left sidebar
- Enable the Filesystem Extension
- Add your Google Drive offline folder to the allowed directories (e.g.,
C:\GDrive\holy-bio-mcp\My Disk\work)
Note: The Filesystem extension is built into Claude Desktop and uses MCP under the hood, but it's managed directly by the application. You don't need to configure it in the JSON file.
6.2: Add gget_mcp Server
- In the same manner, go to Settings, navigate to the "Developer" tab in the left sidebar
- In Developer settings tab, click "Edit Config" button
- This will open the
claude_desktop_config.jsonfile - Edit it and add the gget_mcp server configuration:
{
  "mcpServer

…